Weekend Modders Guide to RGH3 Xbox 360 Corona Motherboard Consoles!
Before you plan your Corona RGH3 modification, you need to know two things about your console - this knowledge will impact the tools you buy and the supplies required.
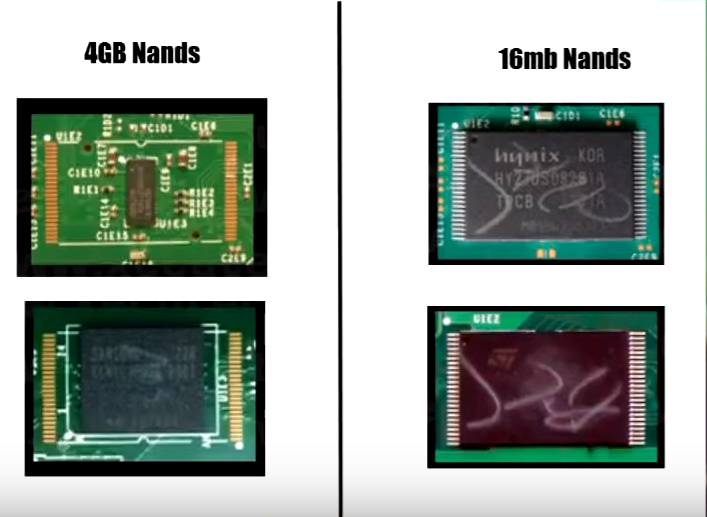
1) Is your console a 16mb Nand or a 4gb Nand Corona. The most concrete way is to physically examine the nand chip on the topside of your consoles motherboard:
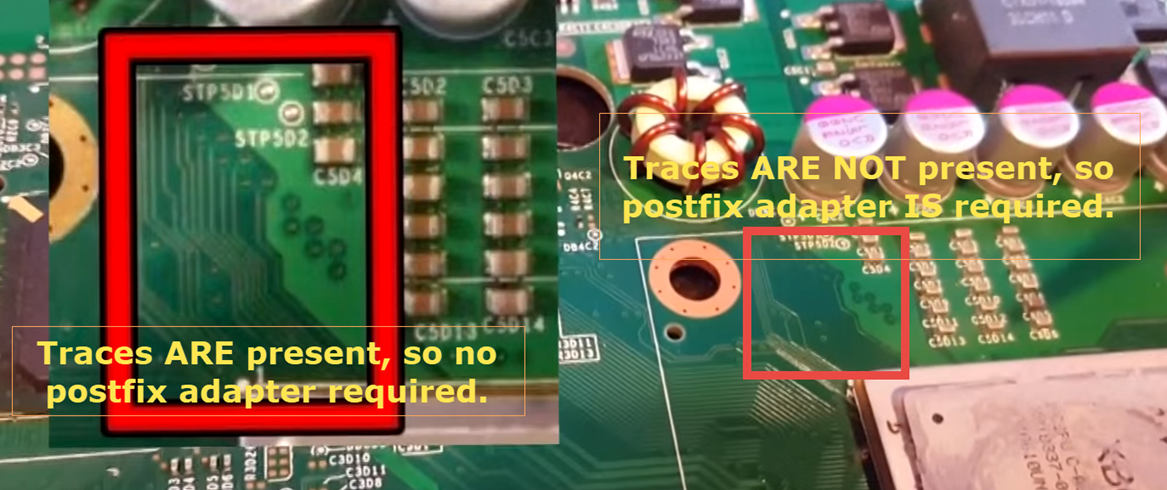
2) Will you require a postfix adapter? The ONLY way to be 100% certain of this is to remove the heatsink from the motherboard, and look.
Required supplies:
- A way to read/write the nand:
If you have a 4gb Nand, you will need a SD Tool, Raspberry Pi Pico set up as a Picoflasher, or alternatively a 4gb R/W tool.
If you have a 16mb nand console, you can use a Nand-X, JR Programmer, Matrix SPI Flasher, Squirt Slave Programmer, X-Flasher 360, PicoFlasher, or even a homemade LPT cable!)
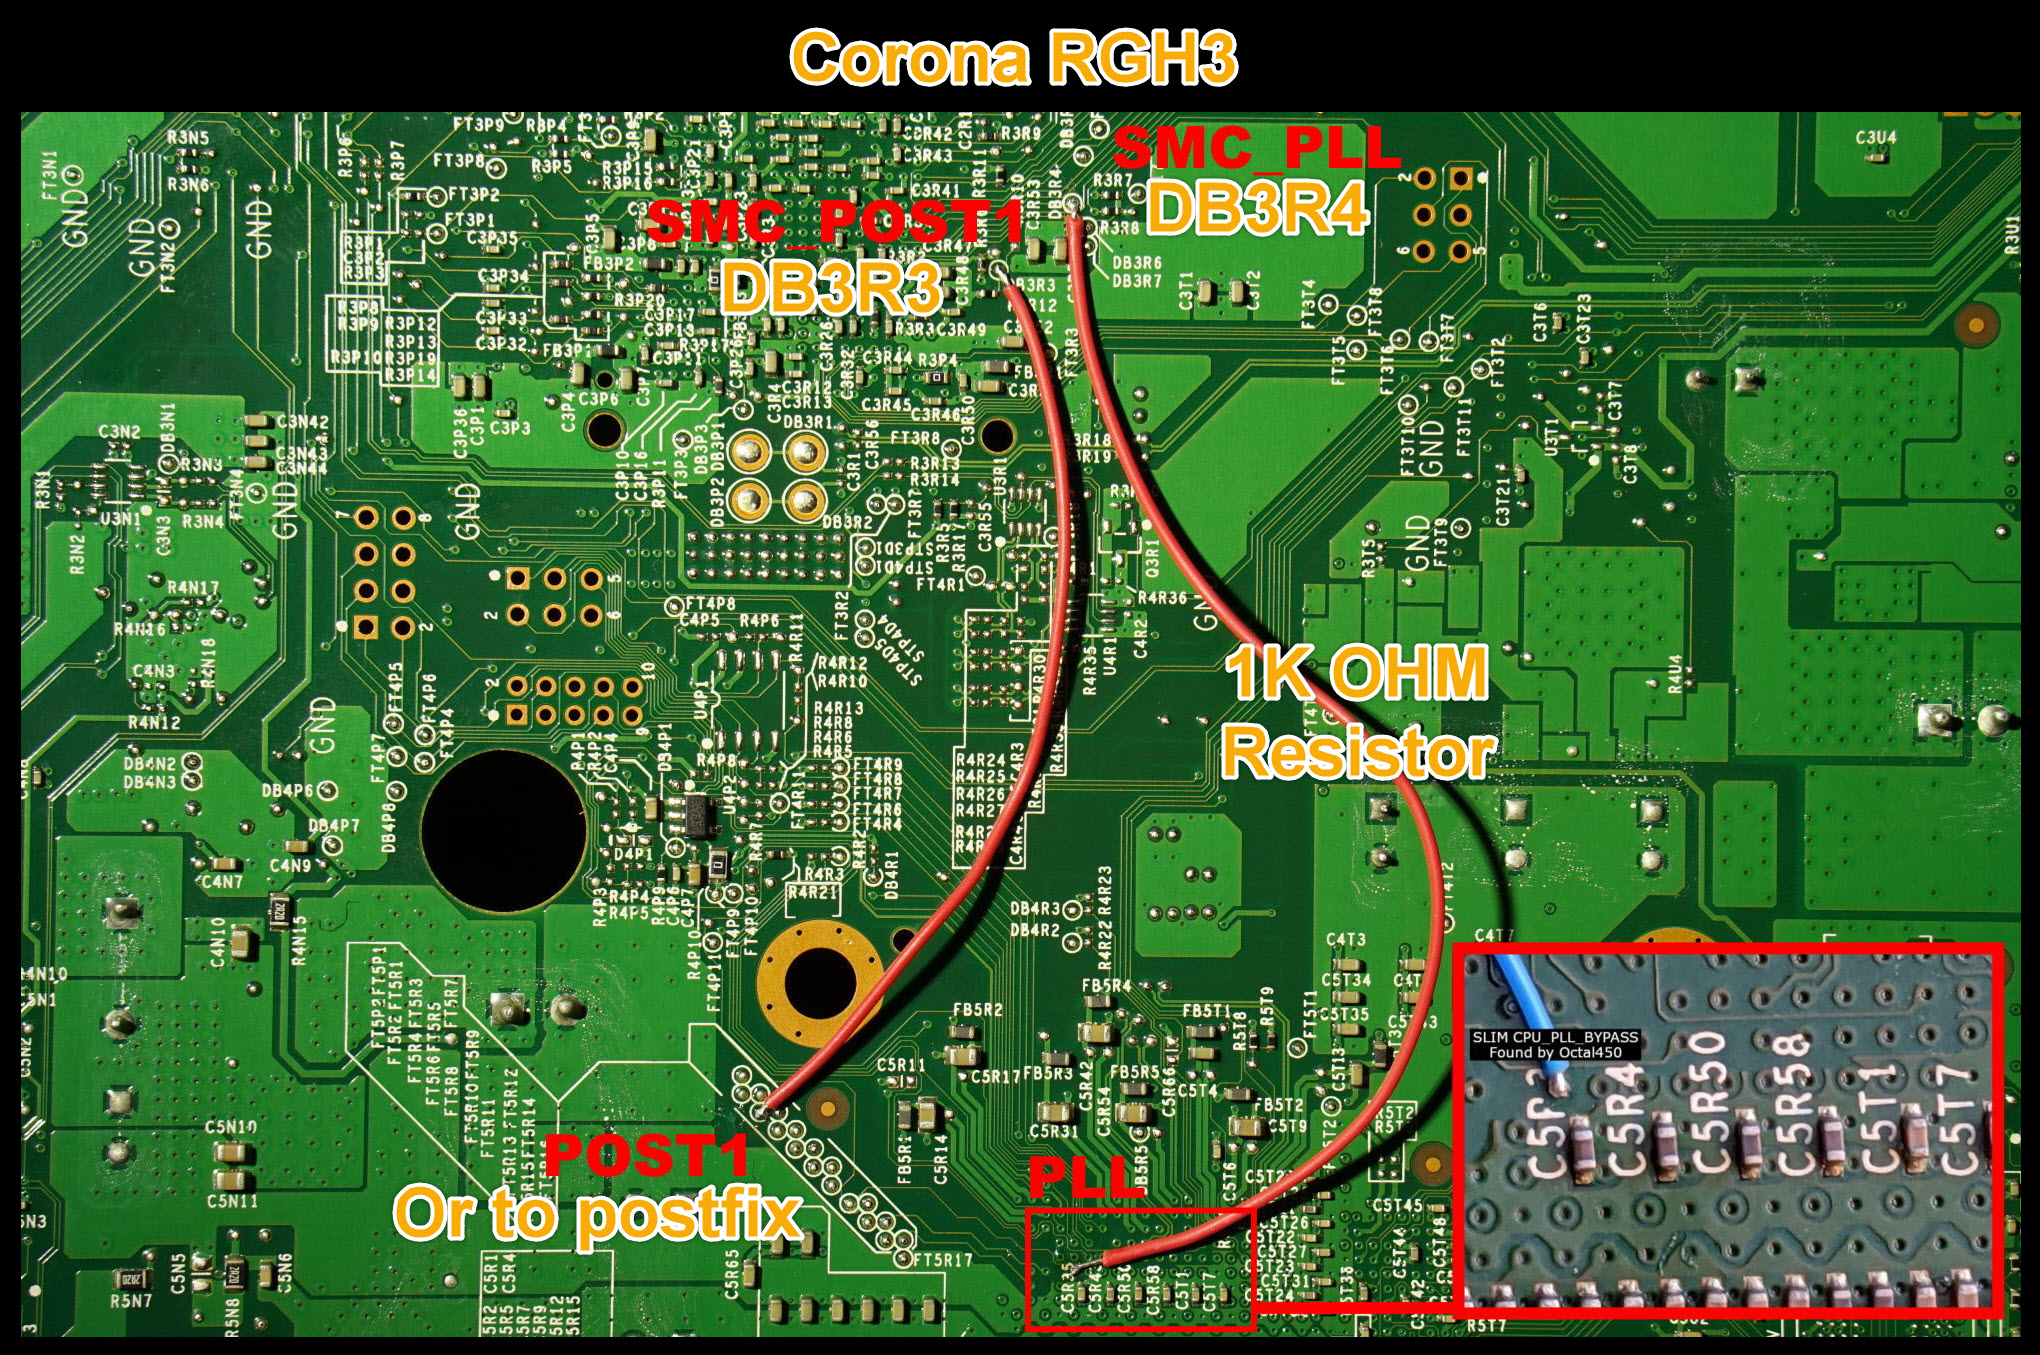
- A 1K Ohm resistor (Consider the RGH3 QSB which comes with the resistor)
- Some 28 or 30 gauge AWG wire (I like this ribbon cable made of 28AWG wire that can be separated and cut to length)
- T8 and a T10 Torx screwdriver for all the screws in the console.
- Standard Soldering supplies: A variable temperature soldering iron, some solder (I like 60/40 rosin core Kester), fiberglass scratch pen, some flux paste and a very sharp set of tweezers or an exacto knife.
- You may require a PostFix Adapter. If you're not sure, you'll need to remove the heatsink from your console and look to see if the post out traces are present or not.
Optional Supplies:
- You might want an X-Clamp removal tool to make opening the console easier.
It's been suggested to me that the X-clamp remover should be in the "required" supplies. For sure the X-Clamp can be removed without them, but the risk of damaging your board is very high if you're not very careful. You might want to check out this video clip of using the X-Clamp removal tool properly to see what you are up against.
- Strongly reccommend replacing the thermal paste with good stuff. Beware fake/low quality thermal paste!
My current (Feb 2022) suggestions:
- If you have a 16mb Nand, then grab a PicoFlasher (Raspberry Pi Pico cost just $4, then load Picoflasher firmware as described here)
- If you have a 4gb Nand, grab a SD Tool if you are only doing 1 console. If you plan to do several, or just like better tools then grab a 4gb R/W tool
- RGH3 QSB (has the 1K Ohm Resistor built in)
No need for a repack any longer. Just get the latest Jrunner build as it supports RGH3 just fine.
My go-to Jrunner source is Josh's build which he kindly hosts at Octals Console Shop:
Jrunner with Extras
But there is an alternative branch that sometimes gets out of sync feature-wise and is on Github under X360Tools like PicoFlasher:
Jrunner Pro
RGH3 Corona Process:
1. Have a Corona motherboard Xbox 360. And know the answers to the two questions up above about your nand size and if you need a postfix.
While there are many varients of the Corona motherboard, they started in the "S" series slims with MFR dates AFTER 08/2011. Generally, the power consumption rating on them will indicate 9.6A whereas a Trinity will usually be marked 10.83A. Once you are sure you have a Corona, boot it up and navigate to the System->Storage screen and if your console has a "memory unit" then it's a 4gb Nand Corona and if not then it's a 16mb nand Corona. Alternately open up the console and look at the nand chips (image up above for reference). You will likely need to open it up anyways to check if you need a postfix.
2. Open up your console and break it down all the way to the motherboard. (Lots of guides on youtube for opening your console.)
You need a T8 and a T10 Torx screwdriver for all the screws in the console. You will end up removing the heatsink and fan, which means removing the X-clamp on the back. You might want an X-Clamp removal tool, and some replacement thermal paste. The stuff on the console will be old and dried up so I strongly recommend putting fresh thermal paste.
3. Solder in a Nand reading/writing programmer.
If you have a 16mb nand:
There are myriad options for programmers: Nand-X, JR Programmer, Matrix SPI Flasher, Squirt Slave Programmer, X-Flasher 360, Super Nand Flasher, PicoFlasher, or even a homemade LPT cable!
If you're only going to do this one mod, my favorite device right now is the Raspberry Pi Pico set up as a PicoFlasher, you can snag the Pico off Amazon for just $8, but the best deal is at a MicroCenter or other major electronics reseller where they are just $4!
The wiring diagram for all these programmers will use these same points, and is likely to use the same color coding:

If you have a 4gb nand:
There are fewer options for reading 4gb nands, you basically mount it like an SD card. If you're only planning to do the one console then pick up an a SD Tool. If you're planning on doing more than one console or you don't have an SD card reader then pick up the a 4gb R/W tool. In both cases you'll be installing onto the header as below.
